티스토리 뷰
중요한 데이터를 다루는 웹 사이트, 웹 페이지, 웹 애플리케이션은 권한이 있는 유저만 접근할 수 있도록 보안을 적용해야 합니다. Springboot에서는 Spring Security 라이브러리를 통해, 보안을 손쉽게 적용할 수 있습니다. Springboot Security뿐만 아니라, LDAP(=Lightweight Directory Access Protocol)를 활용해 웹 보안을 설정 가능합니다. Springboot에서 LDAP로 보안 적용하는 방법이 궁금하신 분들은 아래 링크를 참조 바랍니다.
https://it-techtree.tistory.com/entry/Java-Apply-Security-SpringBoot-Application-With-LDAP
이번 포스팅에서는 Springboot에서 Spring Security를 활용하여 웹 페이지 보안을 적용하는 방법에 대해 알아보겠습니다.
SpringBoot Web MVC 프로젝트 다운로드하기
https://start.spring.io/ 사이트에서 실습할 프로젝트 환경에 맞게 설정한 뒤, 디펜던시 항목에 Spring Web, Thymeleaf를 추가하여 프로젝트를 다운로드합니다.

build.gradle 파일을 열어보면 Spring Web, Thymeleaf 디펜던시가 추가된 것을 확인할 수 있습니다.
implementation 'org.springframework.boot:spring-boot-starter-thymeleaf'
implementation 'org.springframework.boot:spring-boot-starter-web'
로그인 페이지 만들기
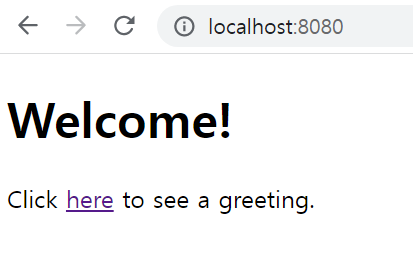
Springboot 실행 후, localhost:8080에 접속하면 로그인 화면이 출력되고, 로그인을 성공하면 hello world가 출력하는 웹 애플리케이션을 작성해보겠습니다. src/main/resources/templates/home.html 경로에 home 문서를 아래와 같이 작성합니다.
<!DOCTYPE html>
<html xmlns="http://www.w3.org/1999/xhtml" xmlns:th="https://www.thymeleaf.org" xmlns:sec="https://www.thymeleaf.org/thymeleaf-extras-springsecurity3">
<head>
    <title>Spring Security Example</title>
</head>
<body>
<h1>Welcome!</h1>

<p>Click <a th:href="@{/hello}">here</a> to see a greeting.</p>
</body>
</html>
Click이라는 문자열을 클릭하면, /hello URL로 진입하는 HTML 문서입니다. Hello world를 출력하는 HTML 문서를 src/main/resources/templates/hello.html 경로에 작성해보겠습니다.
<!DOCTYPE html>
<html xmlns="http://www.w3.org/1999/xhtml" xmlns:th="https://www.thymeleaf.org"
      xmlns:sec="https://www.thymeleaf.org/thymeleaf-extras-springsecurity3">
<head>
    <title>Hello World!</title>
</head>
<body>
<h1 th:inline="text">Hello [[${#httpServletRequest.remoteUser}]]!</h1>
<form th:action="@{/logout}" method="post">
    <input type="submit" value="Sign Out"/>
</form>
</body>
</html>
사이트에 접근하면, Hello {로그인한 유저명}라는 텍스트와 logout버튼이 출력됩니다. 다음으로 로그인 페이지를 src/main/resources/templates/login.html 경로에 작성합니다,
<!DOCTYPE html>
<html xmlns="http://www.w3.org/1999/xhtml" xmlns:th="https://www.thymeleaf.org"
      xmlns:sec="https://www.thymeleaf.org/thymeleaf-extras-springsecurity3">
<head>
    <title>Spring Security Example </title>
</head>
<body>
<div th:if="${param.error}">
    Invalid username and password.
</div>
<div th:if="${param.logout}">
    You have been logged out.
</div>
<form th:action="@{/login}" method="post">
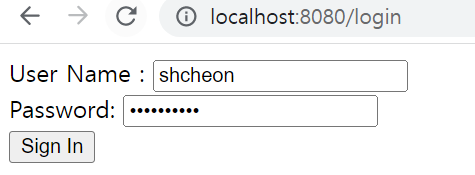
    <div><label> User Name : <input type="text" name="username"/> </label></div>
    <div><label> Password: <input type="password" name="password"/> </label></div>
    <div><input type="submit" value="Sign In"/></div>
</form>
</body>
</html>
User Name과 Password를 입력받아 submit 하는 Form을 보여줍니다. 작성한 HTML 문서를 URL 요청에 따라 View를 처리하는 코드를 작성해보겠습니다. 보통은 @Controller를 통해 HTTP 요청을 처리하는 클래스를 작성하지만 , WebMvcConfigure를 이용하여 컨트롤러 클래스 없이 View을 처리하는 MvcConfig 클래스를 작성해보겠습니다.
package com.example.demo;

import org.springframework.context.annotation.Configuration;
import org.springframework.web.servlet.config.annotation.ViewControllerRegistry;
import org.springframework.web.servlet.config.annotation.WebMvcConfigurer;

@Configuration
public class MvcConfig implements WebMvcConfigurer {

    public void addViewControllers(ViewControllerRegistry registry) {
        registry.addViewController("/home").setViewName("home");
        registry.addViewController("/").setViewName("home");
        registry.addViewController("/hello").setViewName("hello");
        registry.addViewController("/login").setViewName("login");
    }

}
ViewControllerRegistry를 이용하면 별도의 Controller 클래스 작성 없이, URL과 View를 매핑할 수 있습니다. 프론트용 View 작성 및 URL 처리용 컨트롤러 설정을 완료하였으니, 다음으로 Spring Security로 웹 사이트 보안을 적용하는 코드를 작성해보겠습니다.
웹 사이트를 Spring Security로 보안 적용하기
Spring Security를 사용하려면 디펜던시를 추가해야 합니다. build.gradle파일에 Spring Security 디펜던시를 추가합니다.
implementation 'org.springframework.boot:spring-boot-starter-security'
implementation 'org.springframework.security:spring-security-test'
웹 사이트 보안을 설정하는 코드를 작성해보겠습니다.
package com.example.demo;

import org.springframework.context.annotation.Bean;
import org.springframework.context.annotation.Configuration;
import org.springframework.security.config.annotation.web.builders.HttpSecurity;
import org.springframework.security.config.annotation.web.configuration.EnableWebSecurity;
import org.springframework.security.config.annotation.web.configuration.WebSecurityConfigurerAdapter;
import org.springframework.security.core.userdetails.User;
import org.springframework.security.core.userdetails.UserDetails;
import org.springframework.security.core.userdetails.UserDetailsService;
import org.springframework.security.provisioning.InMemoryUserDetailsManager;

@Configuration
@EnableWebSecurity
public class WebSecurityConfig extends WebSecurityConfigurerAdapter {
    @Override
    protected void configure(HttpSecurity http) throws Exception {
        http
                .authorizeRequests()
                .antMatchers("/", "/home").permitAll()
                .anyRequest().authenticated()
                .and()
                .formLogin()
                .loginPage("/login")
                .permitAll()
                .and()
                .logout()
                .permitAll();
    }

    @Bean
    @Override
    public UserDetailsService userDetailsService() {
        UserDetails user =
                User.withDefaultPasswordEncoder()
                        .username("shcheon")
                        .password("shcheon123")
                        .roles("USER")
                        .build();

        return new InMemoryUserDetailsManager(user);
    }
}
localhost:8080에 접근 시, "/", "/home" URL 접근은 모두 허용하고, 그 외에 사이트는 login 인증을 수행하도록 페이지를 리다이렉션 하도록 설정합니다. 그리고, 접근 권한을 가진 유저는 id는 테스트로 shcheon로 지정하고, 패스워드는 shcheon123으로 설정합니다.
Spring Security를 통해 로그인 권한 인증 보안이 잘 적용되었는지 테스트해보면, /hello에 접근하려면 로그인을 요청하는 페이지로 이동되는 것을 확인할 수 있습니다.


지금까지 Spring Security로 웹 사이트, 웹 페이지 보안을 적용하는 방법에 대해 알아보았습니다.
'IT 기술' 카테고리의 다른 글
| Springboot에서 HATEOAS 기반 RESTful API 개발하기 (0) | 2022.08.25 |
|---|---|
| 구글 서치콘솔 현재 색인이 생성되지 않음 제외됨 해결방법 (0) | 2022.08.25 |
| Springboot LDAP 로그인 보안 적용하기 (0) | 2022.08.16 |
| 티스토리 블로그를 구글 검색에 등록하는 방법 (0) | 2022.08.16 |
| Springboot에서 ActiveMQ로 메세시 송수신하기 (0) | 2022.08.09 |
- Total
- Today
- Yesterday
- 디자인패턴 구조패턴
- 전세가 협의
- 전세가격 협상
- 미등기 신축 아파트
- 클린코드작성법
- 스프링부트빌드
- 테스팅 자동화
- codesmell 유형
- 미등기 신축아파트 대출
- 미등기 신축아파트 전세
- springboot 실행
- oracle 메모리
- 스프링부트 restapi
- 코드스멜 유형
- notion
- API Gateway 캐싱
- 신혼부부 전세
- springboot rest api 서버
- selenium
- TCP/UDP
- notion 업무일정관리
- 전세가협상
- 멀티코어 멀티프로세서
- oracle pga sga
- springboot build
- 클린코드작성원칙
- MPA
- iframe 태그 찾기
- 스프링부트실행
- springboot restapi
| 일 | 월 | 화 | 수 | 목 | 금 | 토 |
|---|---|---|---|---|---|---|
| 1 | 2 | 3 | 4 | 5 | 6 | 7 |
| 8 | 9 | 10 | 11 | 12 | 13 | 14 |
| 15 | 16 | 17 | 18 | 19 | 20 | 21 |
| 22 | 23 | 24 | 25 | 26 | 27 | 28 |
